

I apologize that I haven't been posting very regularly, real-life has gotten in the way. What is always a busy season has become even more so with a crash of the economy and fear of lay-offs after January 1. It is a scary time, not just for me but everyone, however I hope the true story below will help you to remember that even in bad times, the kindness of strangers will win in the long run.
I live in a small quaint neighborhood. Wide tree lined streets, children playing in their front yards, dogs barking, neighbors being neighbors. In many ways it is an idyllic neighborhood.
One of the wonderful features of my neighborhood is a throw-back to my own childhood, the ice cream man. Back in the early spring the ice-cream man began to drive through our neighborhood each afternoon. Carousel style music from his van would fill the air and watching the excitement on the kid's faces is always magical.
The sweet simplicity of the ice-cream man was shattered on Wednesday, December 3rd, when less than a block from his home he was robbed and murdered.
Murdered for the small amounts of cash he had in his vehicle.
In the subsequent days after this senseless murder the carousel music went silent, but the cries of his family and our community have been overwhelming.
I never knew the Ice Cream Man, nor did the majority of our community.... we never knew him by name, we only knew him as a kind man who was working to bring back a simpler time, a time when the ice cream man was greeted by the squeals of children, sadly the senseless murder has also silenced those squeals.
In the days following the murder we learned a lot more about the Ice Cream Man. His name was Fresnel Atilus, a 32 year old, out of work construction worker. Mr. Atilus was a Haitian immigrant who, when he lost his job in construction, began selling ice-cream to support his wife and six-children.
From all accounts, all Mr. Atilus was trying to do was realise the American dream and support his family, a seventh child is on the way.
Although I never knew him, I was and still am heartbroken over Mr. Atilus murder. I didn't sleep the night of his murder, I just couldn't stop thinking about how this man had been gunned down for the money you would find on an ice-cream truck.
When I arose the next morning I decided I could be sad and do nothing, or be sad and do something, but what?
When I got to work, I sat down at my keyboard and began to write. I wrote an email to my friends and business associates, I told them how I never knew Mr. Atilus but how he affected my life. In a simple email I told his story. I asked my friends and associates to send me money, after all Christmas is just around the corner, there is a family with no father, a wife with no husband and six (seven) children who had been robbed of the magic an ice-cream man can make in your life.
I sent my email to about 60 people. Immediately I began to get emails back telling me a check would be in the mail that day. This past Monday, because of the kindness of strangers, I was able to drop off almost $2000 from people who never knew Fresnel Atilus. I am still getting checks. I received checks from people I don't even know, people who were sent the email from friends of theirs.
Many other people have stepped forward to help this family as well. A furniture store brought new mattresses and a dining room table, sadly the family had been sleeping on the floor. Toys and clothes have been donated by people throughout our community and a Fund was set up through a local bank to help the family with financial needs.
As sad as it is to think about someone being murdered for the money found on an ice-cream truck, the light of hope can be found through the kindness of strangers. My small contribution was minimal, but together many small contributions can, and will, make a difference for the family of the Ice-Cream Man, Fresnel Atilus.
Thursday, December 18, 2008
Monday, December 1, 2008
My favorite new product.

A friend recently turned me on to this product and I LOVE it! Fabuloso is an all purpose cleaner that you can find in most big box stores. It cleans ANYTHING and leaves a wonderful fresh smell. I use the Ocean Paradise scent.
Try Fabuloso, I can't recommend it enough!
Fabuloso helps make Home Made Easy.
Saturday, November 29, 2008
Change of plans
Last week I was telling you all how excited I was for Thanksgiving, I teased about my beautiful tablescape and the meal I was cooking. CHANGE OF PLANS!
The original plan was dinner at my house for 12, no big deal. As the week went on, the neighbors and I started talking and several people didn't have anywhere to go. Others had family coming in that they didn't want to be trapped with and with this in mind we decided to all have Thanksgiving together. One problem, 30 people.
Only one house in the neighborhood was large enough for all of us, so we moved the entire Thanksgiving celebration across the street.
We divided up the tasks for the meal and I was responsible for a vegetable and dessert. My life just got much easier!
We had a fabulous Thanksgiving and really enjoyed our time together, but I must admit I was disappointed as I enjoy cooking the meal and doing the tablescape, but alas neither was necessary.
I did want to share with you what I had planned for the tablescape and apologize that there are no photos, but like I said, it never happened.
- Plain white linen cloth
- Antique crocheted overlay
- Wrought Iron Candelabra that runs the length of my table
- Petite votives
- Assorted photos in frames of various sizes of family and friends who I am thankful for. The photos would be interspersed along the table and at varying heights.
- Cobalt blue linen place mats
- Solid white china
- Silver flatware
- Cobalt blue water glasses
- Long stem crystal wine glasses
- Blue and white plaid linen napkins with silver napkin rings
- Place cards were to be my special message to each guest. On a white card and written in silver ink the card would say "Leigh, I am thankful for your kindness." "Clint, I am thankful for your generosity." etc. etc.
- Each person was to also have "to go" bags. Using craft paper lunch bags and tied with festive ribbons, each person would have taken away their left-overs for the next day.
Oh well, it didn't happen this year. I hope you had a wonderful Thanksgiving and that your celebration was Home Made Easy.
Monday, November 24, 2008
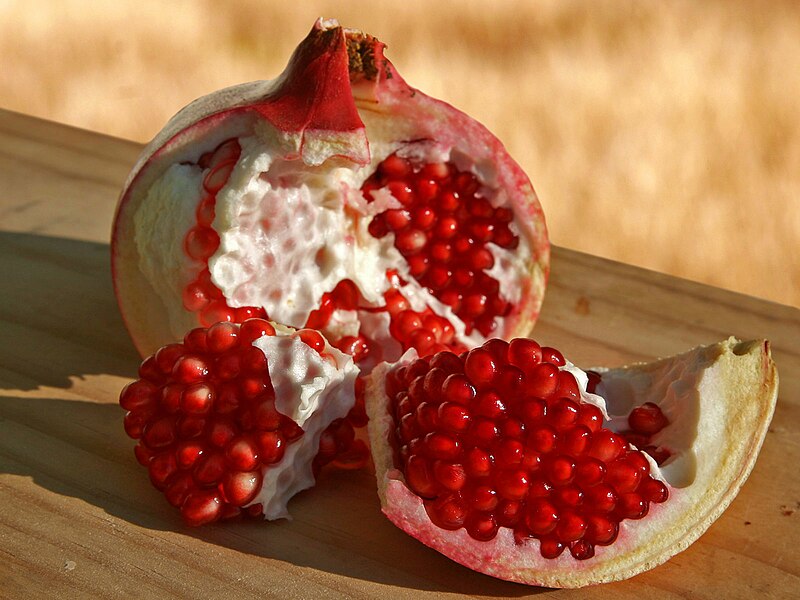
Pomegranate Spritzer

I received an email from a reader asking about one of the items on my Thanksgiving menu, the Pomegranate Spritzer.
This is something I made up a month or so ago and it has become a favorite for my friends. The drink is refreshing and smooth.
Wine isn't a taste that I enjoy, so I decided to make the spritzer and I enjoy it as an alternative for dinner and cocktail parties.
The Pomegranate Spritzer is a simple drink to make, I use a moderately priced zinfandel, pomegranate juice and 7-Up.
Mix equal parts each. Chill and serve.
The Pomegranate Spritzer, Home Made Easy.
Friday, November 21, 2008
The menu
Thanksgiving is my favorite meal to cook each year. I enjoy the whole process, a full day of prepping and cooking and setting the table and making everything look perfect.... for me the preparation of the meal is better than the food.
I begin the day early, usually with the Macy's Thanksgiving Day parade playing in the background. I start by stuffing the turkey, basting and putting it in the oven. Followed by preparations for my dressing and desserts.
The last items of the day are the side dishes.
I like to begin serving appetizers around 2PM followed by dinner at 5 sharp.
This year's menu is a very traditional meal filled with family favorites.....
When I moved to Florida, my friends had no idea what I meant when I mentioned dressing for a Thanksgiving gathering. I found that dressing is typically a southern dish (and for those of you who don't live here, Florida really isn't southern....who knew!), in the rest of the country people just stuff the bird and serve stuffing. In the south we make dressing.
Growing up my mother and grandmother would spend hours discussing the dressing, you could never make it too perfect and in our family the challenge was intensified..... some of us (the smart ones) like the dressing super thin, the family members who have no culinary taste like the dressing thick. My mother and grandmother would work diligently to make sure everyone got what they wanted, so they would always cook 3 pans of dressing.... one thick, one thin and one medium. The medium pan was for nibbling as we prepared for the main feast.
I have carried on the tradition of 3 pans as well, whether I am surrounded by family or friends, it just makes Thanksgiving a bit more special when I prepare those three pans of dressing in a salute to my mama and ma-ma.
If you haven't tried dressing give it a try sometime, it isn't difficult; however, it is time consuming, but worth the time and effort when you see the satisfaction on your guests face.
Cornbread Dressing Recipe
Buttermilk Cornbread (I make it from scratch)
1 Package of Seasoned Stove Top Stuffing Mix
Loaf Bread (Preferably white)
The breads for your stuffing may be cooked on the day of service or 2 - 3 days ahead of time. Crumble all the bread items together and set aside.
1 Large Onion Chopped
Celery Chopped
Smother the chopped onion and celery and combine with the breads
6 hard boiled eggs, crumbled and mixed with the other ingredients
8 cups of Chicken Stock mixed into the dry ingredients
4 sticks of butter melted and mixed with the other ingredients
Fresh herbs
salt and pepper to taste
Poultry Seasoning to taste
Combine all the wet and dry ingredients. Press into a large pan or cast iron frying pans. Bake at 350 for approximately 45 minutes.
Serve with turkey as a side dish with gravy or dry.
Cornbread dressing makes a GREAT accent to a turkey sandwich the day after Thanksgiving, so enjoy this southern tradition, it is Home Made Easy.
I begin the day early, usually with the Macy's Thanksgiving Day parade playing in the background. I start by stuffing the turkey, basting and putting it in the oven. Followed by preparations for my dressing and desserts.
The last items of the day are the side dishes.
I like to begin serving appetizers around 2PM followed by dinner at 5 sharp.
This year's menu is a very traditional meal filled with family favorites.....
Turkey,
stuffed with apples, celery, onion, orange and potatoes
Cornbread Dressing
(recipe below)
Gravy
Broccoli Casserole
Sweet Potato Souffle
Deviled Eggs
Green Beans
Black Eye Peas
Seven Layer Salad
Mandarin Orange Congealed Salad
Cranberry Mold
accented with fresh fruit salad topping
Mini Pumpkin and Pecan Pie Tarts
Pomegranate Spritzer
Ice Tea
When I moved to Florida, my friends had no idea what I meant when I mentioned dressing for a Thanksgiving gathering. I found that dressing is typically a southern dish (and for those of you who don't live here, Florida really isn't southern....who knew!), in the rest of the country people just stuff the bird and serve stuffing. In the south we make dressing.
Growing up my mother and grandmother would spend hours discussing the dressing, you could never make it too perfect and in our family the challenge was intensified..... some of us (the smart ones) like the dressing super thin, the family members who have no culinary taste like the dressing thick. My mother and grandmother would work diligently to make sure everyone got what they wanted, so they would always cook 3 pans of dressing.... one thick, one thin and one medium. The medium pan was for nibbling as we prepared for the main feast.
I have carried on the tradition of 3 pans as well, whether I am surrounded by family or friends, it just makes Thanksgiving a bit more special when I prepare those three pans of dressing in a salute to my mama and ma-ma.
If you haven't tried dressing give it a try sometime, it isn't difficult; however, it is time consuming, but worth the time and effort when you see the satisfaction on your guests face.
Cornbread Dressing Recipe
Buttermilk Cornbread (I make it from scratch)
1 Package of Seasoned Stove Top Stuffing Mix
Loaf Bread (Preferably white)
The breads for your stuffing may be cooked on the day of service or 2 - 3 days ahead of time. Crumble all the bread items together and set aside.
1 Large Onion Chopped
Celery Chopped
Smother the chopped onion and celery and combine with the breads
6 hard boiled eggs, crumbled and mixed with the other ingredients
8 cups of Chicken Stock mixed into the dry ingredients
4 sticks of butter melted and mixed with the other ingredients
Fresh herbs
salt and pepper to taste
Poultry Seasoning to taste
Combine all the wet and dry ingredients. Press into a large pan or cast iron frying pans. Bake at 350 for approximately 45 minutes.
Serve with turkey as a side dish with gravy or dry.
Cornbread dressing makes a GREAT accent to a turkey sandwich the day after Thanksgiving, so enjoy this southern tradition, it is Home Made Easy.
Thursday, November 20, 2008
Things to Come
I am incredibly excited about Thanksgiving. I have planned a traditional menu, but I am most excited about my table scape, I will be setting it up this weekend, so make sure you stop in later for all the details and photos.
To make the table scape even more interesting, I am not buying ANYTHING, it is being created by things I have around the house.
Now that, my friends is the epitome home made easy!
To make the table scape even more interesting, I am not buying ANYTHING, it is being created by things I have around the house.
Now that, my friends is the epitome home made easy!
Sunday, November 2, 2008
Election Night Dining
This week is election week, can you believe it? Finally after 2 years of running we are very close to having a new President.
With this in mind, I have put together some menu ideas for Election Night that could be fun if you are a Democrat, Republican or Independent. So take a look and choose your favorites, but just remember to VOTE! Not only with your menu but at the ballot box as well.
McCain - Palin Voters...
Cranberry Salad (Arizona)
Chicken Enchiladas (Arizona)
Alaskan King Crab Legs (Alaska)
Corn and Chile Salsa (Arizona)
Tomatillo (Arizona)
Mexican Cornbread (Arizona)
Peach and Berries Cobbler (Arizona)
Obama - Biden Voters...
Crab Puffs (Delaware)
Carrot Soup (Delaware)
Deep Dish Pizza Squares (Illinois)
Chicken Vesuvio (Illinois)
Garden Peas (Delaware)
Fried Tomatoes with Horseradish Glaze (Illinois)
Sugar Creme Pie with Cracker Jack Topping (Illinois)
Independent Voters....
Strawberry and Blueberry Fruit Cups (For those red and blue states)
Hot Dogs and Hamburgers
Baked Beans
Potato Salad
French Fries
Sugar Cookies
Neapolitan Ice Cream
Whoever your candidate or politics, enjoy the menus and have a happy election day, but most importantly VOTE!
That is election night dining, Home Made Easy.
Monday, October 13, 2008
Five Easy Budget Savers
The economy is in the tank and we are all struggling. I have been searching for as many cost savings tactics that I can successfully implement into my own household.
Today I share 5 easy cost-savings steps that you can put into effect in your own household to help get through these difficult times. I am always searching for more, so if you have any ideas, add them down in the comments section for others.
Dump the Dry-Cleaning
Until recently I was spending 40 - 50 dollars per week on dry-cleaning. I sent all of my work clothes out to be laundered. When the economic crunch hit, this was one of the first things I cut back on. Now, I am laundering all my work clothes at home. I have started ironing while I watch television and it isn't so bad. One of my biggest worries when I started doing my own laundry was wrinkles, I love heavy starch in my shirts and can't stand wrinkles. A friend told me about a great product, Downy Wrinkle Releaser, it really works and gives the clothes a nice fresh smell as well.
 Weekly Savings $40
Yearly Savings: $2,080
Save Your Change
For years I have saved change. I don't ever spend it under any circumstance, I only spend bills. At the end of the day I have a large jar I put the change in. I average at least $1.00 per day in change. During the Spring I emptied the jar because it was full, imagine my surprise when I had $1,368.49 in change saved!

Weekly Savings $7
Yearly Savings $365
Internet Coupons
We all know about coupons in the newspaper, but in today's culture one of the most important marketing tools any company has is their website. Before I go to the grocery I make my shopping list and then check out websites. Product websites often feature coupons that you won't find anywhere else, check it out, on my last visit to the grocery I had $12 in Internet coupons, I am a single person household so I don't buy as frequently as most, you can do much better than $12.

Weekly Savings $12
Yearly Savings $624
Hang It
As a child I loved the smell of sheets that had been hung out to dry on the line. I have reinstated the clothes line tradition in my own backyard. I am fortunate this time of year it is still warm in south Florida, so I can hang year round, but whenever available I highly recommend it, a clothesline is a great cost cutter and it is good for the environment as well! As in the last hint, remember I am a single person household so my cost may be lower than yours, I usually do 5 loads of laundry per week total, I know people who do that many per day, but if you save just 50 cents per load, that comes to $2.50 per week.

Weekly Savings $2.50
Yearly Savings $130
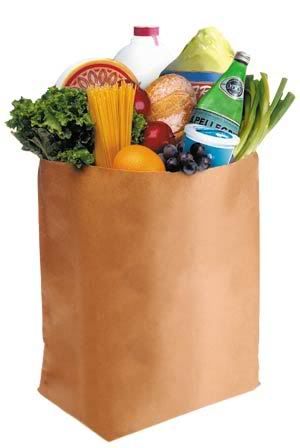
Brown Bag It
One of the best cost savings tools you can do on a day to day basis is brown bag your lunch. I have started cooking roast and turkey breast that can be extended through the week, this helps keep lunch interesting and tasty. I can't brown bag it every day, but I am doing 4 days per week, I usually spend 8 - 12 dollars per day on lunch. Over 4 days at just $8 that is $32 per week, brown bag it and eat in a nearby park, you get some exercise walking to the park and save money in the process!

Weekly Savings $32
Yearly Savings (Based on 50 Weeks) $1600
Those are some easy cost cutting tools that have a big pay-off. Any idea how much we just saved with those 5 easy tips?
$4,799!!!
And that is how you live on a budget and reap the rewards, Home Made Easy!
Tuesday, September 23, 2008
Simply-Sensational Trail Mix
Trail mix is a quick and easy snack that is filling enough to be a midday meal.
It is also super easy to make and have millions of combination options.
I make trail mix all the time and just keep it in the fridge for a quick snack or meal filler.
Tons of different items can be used in trail mix, I try to keep mine to 3 different products and usually decide what will be included by what is on sale.
One constant is usually raisins. Raisins are a good staple for the trail mix and goes well with whatever you are making.
This weekend when I was shopping I had trail mix on my list of shopping items. I made a quick and easy treat, all with sale items.
 Raisins
Sunflower Seeds
Butterscotch Morsels
Mix 2 cups Raisins
14 oz. Sunflower Seeds
1 lb. Butterscotch Morsels
Mix and Refrigerate

It is also super easy to make and have millions of combination options.
I make trail mix all the time and just keep it in the fridge for a quick snack or meal filler.
Tons of different items can be used in trail mix, I try to keep mine to 3 different products and usually decide what will be included by what is on sale.
One constant is usually raisins. Raisins are a good staple for the trail mix and goes well with whatever you are making.
This weekend when I was shopping I had trail mix on my list of shopping items. I made a quick and easy treat, all with sale items.
RaisinsSunflower Seeds
Butterscotch Morsels
Mix 2 cups Raisins
14 oz. Sunflower Seeds
1 lb. Butterscotch Morsels
Mix and Refrigerate
Quick and easy Trail Mix, Home Made Easy
Sunday, September 21, 2008
Menu Planning on a Budget
We are all being hit by the uncertainty of our economy. I know in the last few months, I have had to look at my expenses and spending in ways that I have never had to do in my life.
While costs keep going up I am looking for ways to cut my spending. I am finding that small cuts add up to big savings in the long run. These are all small changes that I am making, nothing that hurts too much, and some that actually give me a feeling of accomplishment when I am finished.
Today I am going to address food, these small changes can make a big difference of hundreds of dollars each month.
Plan Ahead.
At the beginning of the month when I am doing my budget, I allocate a weekly food allowance. I am using the envelope system for food, I give myself a dollar amount at the beginning of each week, that cash goes into an envelope marked "FOOD". This envelope can't be used for anything else.... and no additional cash may be added to it.

Using the envelope system has forced me to plan ahead when preparing for the week.
My week's schedule is never the same. Some night's it makes sense for me to plan on cooking and eating dinner at home, other times I know I will not be able to do it. Same with work, there are some days that make sense for me to take leftovers for lunch because it fits my schedule, other days I know I am going to have to run out and pick something up, it is all in the planning.
If you plan ahead with your weekly calendar, the schedule seems to work out and the more you do it, the easier it gets to make everything fit. Living alone makes it easier for me than some, I can make some meals (roast, turkey breast etc.) last all week which is a great cost saver and can be used in a variety of different ways which eliminates redundancy in choice.
Add to the envelope.

Just because you allocate yourself a certain amount of $ each week doesn't mean you can't add to it! When I am preparing my weekly shopping list I have gotten really good at checking the sales papers and couponing. I usually do my weekly shopping on Sunday, this gives me time to check the Sunday paper for coupons, check my Internet sites for special offers and check the weekly sales sheet from my grocer.
By the time I get to the grocery, I usually add 5 - 10 dollars in savings or coupons. In all honesty I used to look down on people who coupon, but let me tell you, IT WORKS! Now that I have started, I get a sense of excitement when I am able to use what I clip, the savings make a difference.
Store Brands

Buy store brands whenever possible. Now, there are some brands that I am not willing to compromise on, but most you can't tell a difference in, so try the store brand and see how you like it.
Make a List

DO NOT go to the grocery without a list.... EVER! Grocery shopping without a list is the kiss of death to saving money. Write out a list and stick to it! I realize sticking to the list is difficult, especially when you have to walk by all those great cookies and chips. So, IF AND ONLY IF, I don't have any toiletries items to purchase I allow myself $3 to spend on something special, choosing my treat is always fun and feels rewarding in the overall scheme of saving money.
Be smart about how you cook

Crock pot, grill, microwave, and toaster oven cooking is always better than using the stove. When planning your meals, work towards combination cooking, if you can grill it, GRILL IT. If you can put it in the crock pot, do it! Combination cooking saves time, saves energy and gives you more opportunities for menu variety.
This week's menu
Sunday:
Breakfast: Cereal and Toast at home
Lunch: Watermelon
Dinner: I have Bible Study at 5 and we all bring our dinner, so I will stop on the way and grab a sandwich.
Monday:
Breakfast: Cereal and Toast at home
Lunch: We had a new restaurant open on property last week and I have a free lunch card.... WOOHOO, Monday's lunch is free!
Dinner: I will have time to cook because I get home Monday without having to work late. Bottom Round Roast is on sale this week. I will put the roast in my crock pot on Monday morning before I leave for work and include carrots, potatoes, and onion.
Tuesday:
Breakfast: Cereal and Toast at home
Lunch: Leftover Roast beef, potatoes, carrots and onions
Dinner: Salad, Vegetables and Toast
Wednesday:
Breakfast: Cereal and Toast at home
Lunch: Roast Beef Sandwich with chips and cookies (I buy the individual small packs)
Dinner: I have Pilate's and my personal finance class after work, I won't get home until late, so I will pack watermelon chunks for dinner.
Thursday:
Breakfast: Cereal and toast at home
Lunch: Watermelon chunks and homemade trail mix
Dinner: I have a meeting after work and won't arrive home until after 7:30. I will eat a roast beef sandwich
Friday:
Breakfast: Cereal and toast at home
Lunch: Lunch meeting and I was the one invited, so today lunch is free!
Dinner: Vegetable Soup (I canned some vegetable soup mix over the summer, I will warm that along with the remnants of the roast beef, this will be good for the weekend.)
Saturday:
Breakfast: Watermelon
Lunch: I am working at my part time job on Saturday, which includes free lunch!
Dinner: Vegetable Soup

I just returned from the grocery, I bought all the items needed for the week's menu, plus TP and Paper Towels.
Total spent: $47.01
Total savings: $9.26
Woohoo, I stayed under budget and got several Buy One Get One Free Items which will go into next week as well!!!!!!!!!
While costs keep going up I am looking for ways to cut my spending. I am finding that small cuts add up to big savings in the long run. These are all small changes that I am making, nothing that hurts too much, and some that actually give me a feeling of accomplishment when I am finished.
Today I am going to address food, these small changes can make a big difference of hundreds of dollars each month.
Plan Ahead.
At the beginning of the month when I am doing my budget, I allocate a weekly food allowance. I am using the envelope system for food, I give myself a dollar amount at the beginning of each week, that cash goes into an envelope marked "FOOD". This envelope can't be used for anything else.... and no additional cash may be added to it.
Using the envelope system has forced me to plan ahead when preparing for the week.
My week's schedule is never the same. Some night's it makes sense for me to plan on cooking and eating dinner at home, other times I know I will not be able to do it. Same with work, there are some days that make sense for me to take leftovers for lunch because it fits my schedule, other days I know I am going to have to run out and pick something up, it is all in the planning.
If you plan ahead with your weekly calendar, the schedule seems to work out and the more you do it, the easier it gets to make everything fit. Living alone makes it easier for me than some, I can make some meals (roast, turkey breast etc.) last all week which is a great cost saver and can be used in a variety of different ways which eliminates redundancy in choice.
Add to the envelope.
Just because you allocate yourself a certain amount of $ each week doesn't mean you can't add to it! When I am preparing my weekly shopping list I have gotten really good at checking the sales papers and couponing. I usually do my weekly shopping on Sunday, this gives me time to check the Sunday paper for coupons, check my Internet sites for special offers and check the weekly sales sheet from my grocer.
By the time I get to the grocery, I usually add 5 - 10 dollars in savings or coupons. In all honesty I used to look down on people who coupon, but let me tell you, IT WORKS! Now that I have started, I get a sense of excitement when I am able to use what I clip, the savings make a difference.
Store Brands
Buy store brands whenever possible. Now, there are some brands that I am not willing to compromise on, but most you can't tell a difference in, so try the store brand and see how you like it.
Make a List
DO NOT go to the grocery without a list.... EVER! Grocery shopping without a list is the kiss of death to saving money. Write out a list and stick to it! I realize sticking to the list is difficult, especially when you have to walk by all those great cookies and chips. So, IF AND ONLY IF, I don't have any toiletries items to purchase I allow myself $3 to spend on something special, choosing my treat is always fun and feels rewarding in the overall scheme of saving money.
Be smart about how you cook
Crock pot, grill, microwave, and toaster oven cooking is always better than using the stove. When planning your meals, work towards combination cooking, if you can grill it, GRILL IT. If you can put it in the crock pot, do it! Combination cooking saves time, saves energy and gives you more opportunities for menu variety.
This week's menu
Sunday:
Breakfast: Cereal and Toast at home
Lunch: Watermelon
Dinner: I have Bible Study at 5 and we all bring our dinner, so I will stop on the way and grab a sandwich.
Monday:
Breakfast: Cereal and Toast at home
Lunch: We had a new restaurant open on property last week and I have a free lunch card.... WOOHOO, Monday's lunch is free!
Dinner: I will have time to cook because I get home Monday without having to work late. Bottom Round Roast is on sale this week. I will put the roast in my crock pot on Monday morning before I leave for work and include carrots, potatoes, and onion.
Tuesday:
Breakfast: Cereal and Toast at home
Lunch: Leftover Roast beef, potatoes, carrots and onions
Dinner: Salad, Vegetables and Toast
Wednesday:
Breakfast: Cereal and Toast at home
Lunch: Roast Beef Sandwich with chips and cookies (I buy the individual small packs)
Dinner: I have Pilate's and my personal finance class after work, I won't get home until late, so I will pack watermelon chunks for dinner.
Thursday:
Breakfast: Cereal and toast at home
Lunch: Watermelon chunks and homemade trail mix
Dinner: I have a meeting after work and won't arrive home until after 7:30. I will eat a roast beef sandwich
Friday:
Breakfast: Cereal and toast at home
Lunch: Lunch meeting and I was the one invited, so today lunch is free!
Dinner: Vegetable Soup (I canned some vegetable soup mix over the summer, I will warm that along with the remnants of the roast beef, this will be good for the weekend.)
Saturday:
Breakfast: Watermelon
Lunch: I am working at my part time job on Saturday, which includes free lunch!
Dinner: Vegetable Soup
I hope this helps you all with your planning and gives you some cost saving tips. Over the next few posts, I will share savings tips on other household plans and hope you will send in your tips also.
The economy may be in the tank and it looks like there is no end in site, but there are always ways to save and make your life Home Made Easy!
UPDATE:
I just returned from the grocery, I bought all the items needed for the week's menu, plus TP and Paper Towels.
Total spent: $47.01
Total savings: $9.26
Woohoo, I stayed under budget and got several Buy One Get One Free Items which will go into next week as well!!!!!!!!!
Tuesday, August 19, 2008
The Best Banana Pudding, EVER!
I am a son of the south, growing up banana pudding was a treat. My mother used to make it for special occasions from scratch including a beautiful meringue.
Through the years I have tried several recipes for banana pudding and it just never matched what my mama used to make. That is until my Aunt sent me a recipe that her grand-daughter had found.
This is absolutely the best banana pudding I have ever eaten and it features an ingredient that I never thought would work.... Sour Creme!?!?!?!
Last week my Church had a covered dish supper for an important vote we had to take, I decided since it was a special occasion I would make the banana pudding. It was a hit! One of my Pastor's, who is pregnant, came up to me after the dinner and told me that she thanked me and her baby thanked me for the pudding, I loved that!
Ingredients:
1- 14 oz. can of sweetened condensed milk
1 1/2 cups of water
1- small box Vanilla Instant Pudding
1- cup whipping creme
1- cup sour creme
6 - 8- Bananas
1- Box Vanilla Wafers
This recipe is NOT for your diet days, it is loaded with all the good stuff that makes eating a celebration, so enjoy!

Slice the bananas.
 Layer the pudding, vanilla wafers and banana, making sure that the pudding ends up as your top layer.

 When you have used all of the mixture, break up a few vanilla wafers and sprinkle them on top.

Through the years I have tried several recipes for banana pudding and it just never matched what my mama used to make. That is until my Aunt sent me a recipe that her grand-daughter had found.
This is absolutely the best banana pudding I have ever eaten and it features an ingredient that I never thought would work.... Sour Creme!?!?!?!
Last week my Church had a covered dish supper for an important vote we had to take, I decided since it was a special occasion I would make the banana pudding. It was a hit! One of my Pastor's, who is pregnant, came up to me after the dinner and told me that she thanked me and her baby thanked me for the pudding, I loved that!
Ingredients:
1- 14 oz. can of sweetened condensed milk
1 1/2 cups of water
1- small box Vanilla Instant Pudding
1- cup whipping creme
1- cup sour creme
6 - 8- Bananas
1- Box Vanilla Wafers
This recipe is NOT for your diet days, it is loaded with all the good stuff that makes eating a celebration, so enjoy!
 Before you begin, put one large bowl and the beaters from your mixer in the freezer. Give them at least 30 minutes to cool.
In a separate bowl, combine the condensed milk and water, mix well and then add the pudding mix. Whisk together until there are no lumps. After this is mixed well, place in the refrigerator.
 Meanwhile, take the bowl and beaters out of your freezer. Pour in one cup of whipping creme, beating until it thickens. (This is the most time consuming part of the recipe, when it is beaten it will look like Cool-Whip. DO NOT over beat the creme!)
After the whipped creme is completed, fold in the sour creme. Remove the original mixture from the refrigerator and fold the two together.
Slice the bananas.
 Layer the pudding, vanilla wafers and banana, making sure that the pudding ends up as your top layer. When you have used all of the mixture, break up a few vanilla wafers and sprinkle them on top.
I served in a trifle bowl that I found at Goodwill. This is a beautiful, tasty recipe that everyone in the family will enjoy.
The Best Banana Pudding, Ever, Home Made Easy!
Tuesday, August 12, 2008
Re purposing an Old Table
I have a confession, I am a pack rat. I find sentiment in most everything and hate to get rid of anything that provides me with pleasant memories.
I have a couple of small end tables that I NEED to get rid of, they are old and beaten up, but they still fill a purpose. I hate to get rid of them, so I decided to re purpose them. (Ok, I only re purposed one, but I may get around to the other one sooner or later.)
A few weeks ago I was taking a few days off work for a stay-cation and was cleaning out closets. I found a box filled with old postcards, letters, notes, photos and greeting cards. When I found the box and started going through the contents I couldn't bare to get rid of the contents.
It hit me, a way to use the cards and re purpose the table.
I started off by selecting a few of the cards that visually made the biggest impact.

After choosing the cards, I cut out the impact images and created a simple layout on the table top.

After deciding on the layout, I used my Modge-Podge to apply the images. For those of you who have never used it, modge podge it SIMPLE. All you need is a sponge brush to apply it.

Using long fluid strokes, apply the modge podge to the back of your application and then over the front. This creates a nice smooth surface for your tabletop.

After the modge podge has dried, coat with a polyurethane spray and you have a re purpose for an old table featuring memories of a lifetime.

Re purposing a table and keeping your memories in tact, Home Made Easy.
I have a couple of small end tables that I NEED to get rid of, they are old and beaten up, but they still fill a purpose. I hate to get rid of them, so I decided to re purpose them. (Ok, I only re purposed one, but I may get around to the other one sooner or later.)
A few weeks ago I was taking a few days off work for a stay-cation and was cleaning out closets. I found a box filled with old postcards, letters, notes, photos and greeting cards. When I found the box and started going through the contents I couldn't bare to get rid of the contents.
It hit me, a way to use the cards and re purpose the table.
I started off by selecting a few of the cards that visually made the biggest impact.
After choosing the cards, I cut out the impact images and created a simple layout on the table top.
After deciding on the layout, I used my Modge-Podge to apply the images. For those of you who have never used it, modge podge it SIMPLE. All you need is a sponge brush to apply it.
Using long fluid strokes, apply the modge podge to the back of your application and then over the front. This creates a nice smooth surface for your tabletop.
After the modge podge has dried, coat with a polyurethane spray and you have a re purpose for an old table featuring memories of a lifetime.

Re purposing a table and keeping your memories in tact, Home Made Easy.
Sunday, August 10, 2008
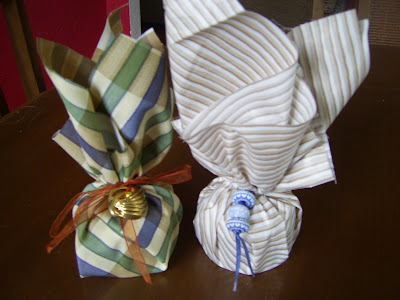
Unique Wrap
Last week at the conclusion of my post on candling I mentioned that the small tin candles make great gifts, especially when presented in a unique gift wrap.
Today, we discuss the gift wrap.
One of the things I look for when visiting yard sales or rummage sales is fabric. I find that you can do a million things with fabric, one of them being using it as gift wrap.
Recently. I hit the jackpot at my Church rummage sale when a parishioner who owns an upholstery business brought in countless rolls of yardage. I bought 16 rolls of fabric, each with at least 5 yards on the roll for an unbelievable $16.
I have used fabric as wrapping paper for years, it molds to the container well and the presentation looks more exquisite than even the most beautiful paper.
When wrapping with fabric choose the cloth you will use.
 Cut the fabric into swatches that will give you sufficient play when covering the gift. The cut doesn't have to be perfect, any imperfections will be hidden in the presentation.
 You will need ribbon, scissors and an "ornament" for attachment. Like fabric, I buy rolls of ribbon whenever I see it. Most fabric stores or craft shops have bins of reduced ribbon on sale at all times, it is not unheard of to find rolls of ribbon for as low as ten cents to $1....I NEVER pay more than $1 for ribbon.
 When you have your gift selected and the fabric cut, place your gift in the center of the fabric swatch.
 When wrapping the tins, I just pulled up all the corners, tied it off with a ribbon and attached beads and buttons to provide ornamentation for my presentation.

Inexpensive, quick, easy and beautiful. Unique gift wrap, Home Made Easy.
Friday, August 8, 2008
Ask HME
A dear friend from several other blogs, Lorraine, sent me an email earlier in the week to recommend I add a feature to the blog.
I loved her idea, so here you go.
Ask HME is for you. Email me here anytime with your questions about homemaking, crafting, recipes, or anything else and I will try my best to answer.
Lorraine's question....
"Dear Home Made Easy, I really love using linen water on my, uh, linens, but all a sudden it seems no one makes it anymore. (I really loved the lavender water from L'Occitane but last time I went to get some the woman said they weren't distributing it in the US anymore. Bastard French. Anyway, I suppose I could look for it online but I was wondering if you have any recipes for a nice linen water that doesn't smell like distilled weeds (because that's what happened the last time I experimented)."
I have to admit, I don't use a lot of linen water, but my mother swears by the stuff. I asked her about it and she admitted she hasn't bought any in years, so I decided to do a bit of online research to see if I could find a good recipe.
I found the recipe here. Made a batch used it earlier in the week and LOVED it! Thanks Lorraine, I have made another batch and will be taking it to my mom when I visit her later in the month.
The recipe is simple, try it for a great night's sleep.
Lavender Linen Water Recipe
Lavender Linen Water is a special sweet water that is designed to perfume cloths, bedding, or your collection of fine linens. Apply while washing or during the folding process.
Add a splash to the rinse cycle, or sprinkle, spray your linens before or during ironing. Lavender has a soothing, calming effect that will help one sleep peacefully.
Here are the ingredients for making your own:
100 drops (5ml) of Lavender Oil
1½ fluid Oz. (45 ml) Vodka. Use highest proof available.
20 Oz. of Distilled or Still Spring water
Blend/Mix the essential oils with the Vodka in a small glass bowl. Stir well to amalgamate. Pour water into a large glass container/bottle. Add the oil mixture to the water. The linen water may be cloudy. This is normal and will not stain linen. Shake well before use.
And this is Linen Water Home Made Easy.
Send your questions in, I look forward to answering them in future posts.
Sunday, August 3, 2008
Candling Made Easy...
I apologize for not posting recently. First I had computer problems and then camera problems and then life got in the way of posting. Hopefully now I am back up and running.


I have been making candles for quite sometime. I find it to be a rewarding and easy craft with a big payoff.
I have made candles in a variety of containers and in a variety of colors, it is super easy and fun.
Recently I found a number of miniature tins at my local craft store for fifty cents each. I bought $20 worth, knowing that they would make super cute candles that I could use for a variety of purposes.
Candling requires a number of steps, all of them easy to follow.
Required for this project is....
A block of wax
Melting pot
Thermometer
Knife
Wicks
Clothes pins
Tins
While you are preparing the process, I place the tins in the over at 170 degrees to warm. This allows the tins to be ready for the melted wax when it is poured in. The tins need to be warm so that the wax doesn't crack when it hardens.
In a large pot of hot water (just before boiling) place the melting pot with a large chunk of wax. Place your thermometer in the wax as it melts. Candle thermometers are marked with temperatures for different containers, always use this it helps with the process as different types of containers require different temps. For a tin you want the wax to melt to approximately 225 degrees.
For me the most difficult step in making candles is getting the wick to stand in the center. Some people use straws, others use the cover of a Bic pen, but most everyone uses clothes pins in the process. I have done all of the above and still use the different techniques depending on the style of candle I am making. For this particular candle I used just the clothes pins and a bead weight to hold it down.
Once the wax is melted you may add color or scents. All of these may be purchased at a craft store. For these particular candles I decided on no color since the containers were so colorful and added apple as my scent.
Pour the wax into your containers leaving a small amount of space at the top.
Don't use all of your wax at this point.... you will need more later!
Once the wax is in the container I then center my wicks and use the clothes pins to hold them in place while the wax hardens.
After the wax has hardened you will find that it may fall a bit in the center, this is when you will reuse the additional melt. Pour in the additional wax and bring it near the top of your container.
After the wax has hardened cut your wicks.
What an adorable and fragrant candle and easy to make!
These candles make great hostess gifts and can be wrapped in delightful creative ways, I will present the fun wraps in a future post.
Candling for yourself or others.... Home Made Easy!
Tuesday, July 15, 2008
Back Soon
I should be back later this week. My computer issues are a real pain and I miss being able to post to this site.
One of the things that makes my post here relevant are the photos, I need them to showcase what I am doing. With my battery issue on the computer I don't have enough power to download.... sigh.
Battery is ordered, should be here any day now.
Don't give up on me!
One of the things that makes my post here relevant are the photos, I need them to showcase what I am doing. With my battery issue on the computer I don't have enough power to download.... sigh.
Battery is ordered, should be here any day now.
Don't give up on me!
Tuesday, July 8, 2008
Commercial Break
Hi everyone, I haven't forgotten about you. I am having some technical difficulties with my computer....ugh!
I have a new battery on order which I hope will correct the problem. Right now I am unable to post any photos from my digital.
I have a couple of fun posts to share, but until I have photo back-up they don't make much sense to post....so bare with me and I will be back very soon, hopefully this weekend with some more great Home Made Easy ideas!
Sunday, June 29, 2008
Cream Cheese Pound Cake
Baking has always been something that interest me, but like many people it also filled me with panic. That is until I took the plunge and decided to just go for it.
When I was a child my grandmother was a wonderful baker, she made us great cakes and cookies growing up and each year all of us were presented with a birthday cake that fit our personality perfectly.
One of my favorite childhood photos is from my 3rd birthday. On my knees, looking in amazement at my Choo-Choo train cake, each car lovingly decorated with vibrant colors as they stood ready to roll down the tracks.
Whenever we visited, my grandmother always had cakes or cookies for us to enjoy. One of her best was a Cream Cheese Pound Cake.
Box cakes are great and have taken much of the mystery out of baking, but to me there is nothing better than baking a cake from scratch, it gives me a tremendous sense of accomplishment.
Yesterday was my neighbor's birthday, my gift to her was my grandmother's cake, with my own twist of a vanilla glaze. Now this cake isn't for the faint of heart and if you are on a diet not something you could eat every day, but for special visits with family or a memorable birthday celebration there is nothing like it!
Cream Cheese Pound Cake with a Vanilla Glaze, Home Made Easy!
Ingredients:
In a large bowl cream butter, cream cheese and sugar together.

Add eggs, one at time, beating well after each.

Add vanilla and a dash of salt.

 Once you have filled the bundt pan, put it into a COLD oven. Bake at 325 for 1 hour, 25 minutes. The cake comes out a beautiful golden brown.

While the cake is cooling, I made a simple glaze for topping. Combine 1/4 cup of sugar, 1 egg, spoonful of butter and 1 teaspoon of vanilla. Whisk and put on the stove top stirring constantly until the sugar has dissolved and the mixture is liquid. (DO NOT BOIL!)
After the glaze is complete drizzle it over the cake.

When I was a child my grandmother was a wonderful baker, she made us great cakes and cookies growing up and each year all of us were presented with a birthday cake that fit our personality perfectly.
One of my favorite childhood photos is from my 3rd birthday. On my knees, looking in amazement at my Choo-Choo train cake, each car lovingly decorated with vibrant colors as they stood ready to roll down the tracks.
Whenever we visited, my grandmother always had cakes or cookies for us to enjoy. One of her best was a Cream Cheese Pound Cake.
Box cakes are great and have taken much of the mystery out of baking, but to me there is nothing better than baking a cake from scratch, it gives me a tremendous sense of accomplishment.
Yesterday was my neighbor's birthday, my gift to her was my grandmother's cake, with my own twist of a vanilla glaze. Now this cake isn't for the faint of heart and if you are on a diet not something you could eat every day, but for special visits with family or a memorable birthday celebration there is nothing like it!
Cream Cheese Pound Cake with a Vanilla Glaze, Home Made Easy!
Ingredients:
2 1/2 sticks of butter
3 cups sugar
3 cups sifted cake flour (I use self-rising flour instead, because I am lazy and don't like to sift. You can't tell the difference.)
8oz. package of cream cheese
6 large eggs
dash of salt
1 1/2 teaspoon of vanilla
In a large bowl cream butter, cream cheese and sugar together.

Add eggs, one at time, beating well after each.
Add vanilla and a dash of salt.
Add flour, mixing well and pour into a bundt pan.
 Once you have filled the bundt pan, put it into a COLD oven. Bake at 325 for 1 hour, 25 minutes. The cake comes out a beautiful golden brown.
While the cake is cooling, I made a simple glaze for topping. Combine 1/4 cup of sugar, 1 egg, spoonful of butter and 1 teaspoon of vanilla. Whisk and put on the stove top stirring constantly until the sugar has dissolved and the mixture is liquid. (DO NOT BOIL!)
After the glaze is complete drizzle it over the cake.
This cake has an amazing taste, it is a substantial dessert and great with berries, ice cream or by itself.
Childhood memories, celebrating a friend's birthday and a delicious cake made from scratch. Cream Cheese Pound Cake with a Vanilla Glaze is a wonderful Home Made Easy dessert!
Friday, June 27, 2008
Button Up Your Picture Frame
When I am crafting, one of the things I like to do most is "update" a project.
Recently I have found that using old buttons is a great way to make something old, new again, giving a great unique look to a traditional item.
Using buttons I recently made a plain wooden picture frame into something worthy of a cherished family photo.
Check it out, this is Home Made Easy....
What's Needed....
A plain picture frame
Variety of buttons
Hot glue gun
Clippers
 Using large buttons as a backdrop and for interest, these usually need to have the loops clipped off the back.
  Clipping the first button allows you to create a solid base that you can then build on. Using the glue gun, I start in the corner of my frame and then add to the creation.

As you add buttons the dimension of the design will become evident. Be creative with the buttons, I try to keep an overall color scheme but use a variety of styles to create interest.
 I think these frames are fun and makes the photo chosen for display even more special. Placed next to an oversize decor piece the frame provides a one of a kind point of interest.

A beautiful picture frame, buttoned up.... Home Made Easy.
Recently I have found that using old buttons is a great way to make something old, new again, giving a great unique look to a traditional item.
Using buttons I recently made a plain wooden picture frame into something worthy of a cherished family photo.
Check it out, this is Home Made Easy....
What's Needed....
A plain picture frame
Variety of buttons
Hot glue gun
Clippers
 Using large buttons as a backdrop and for interest, these usually need to have the loops clipped off the back. Clipping the first button allows you to create a solid base that you can then build on. Using the glue gun, I start in the corner of my frame and then add to the creation.
As you add buttons the dimension of the design will become evident. Be creative with the buttons, I try to keep an overall color scheme but use a variety of styles to create interest.
 As you finish up with one side, accent the design with smaller beads, interesting colors and theme buttons.

After completing one side of the frame, move on. If you are doing all sides just continue the process around.
For this frame I chose to only do two sides, I thought it made the frame more interesting and highlighted the beauty of the original wood. I don't try to match the sides; however, I do try to balance them, but never match.
 I think these frames are fun and makes the photo chosen for display even more special. Placed next to an oversize decor piece the frame provides a one of a kind point of interest.
A beautiful picture frame, buttoned up.... Home Made Easy.
Subscribe to:
Posts (Atom)