Tuesday, September 23, 2008

Simply-Sensational Trail Mix

Trail mix is a quick and easy snack that is filling enough to be a midday meal.

It is also super easy to make and have millions of combination options.

I make trail mix all the time and just keep it in the fridge for a quick snack or meal filler.

Tons of different items can be used in trail mix, I try to keep mine to 3 different products and usually decide what will be included by what is on sale.

One constant is usually raisins. Raisins are a good staple for the trail mix and goes well with whatever you are making.

This weekend when I was shopping I had trail mix on my list of shopping items. I made a quick and easy treat, all with sale items.

Raisins
Sunflower Seeds
Butterscotch Morsels

Mix 2 cups Raisins
14 oz. Sunflower Seeds
1 lb. Butterscotch Morsels

Mix and Refrigerate


Quick and easy Trail Mix, Home Made Easy

Sunday, September 21, 2008

Menu Planning on a Budget

We are all being hit by the uncertainty of our economy. I know in the last few months, I have had to look at my expenses and spending in ways that I have never had to do in my life.

While costs keep going up I am looking for ways to cut my spending. I am finding that small cuts add up to big savings in the long run. These are all small changes that I am making, nothing that hurts too much, and some that actually give me a feeling of accomplishment when I am finished.

Today I am going to address food, these small changes can make a big difference of hundreds of dollars each month.

Plan Ahead.


At the beginning of the month when I am doing my budget, I allocate a weekly food allowance. I am using the envelope system for food, I give myself a dollar amount at the beginning of each week, that cash goes into an envelope marked "FOOD". This envelope can't be used for anything else.... and no additional cash may be added to it.


Using the envelope system has forced me to plan ahead when preparing for the week.

My week's schedule is never the same. Some night's it makes sense for me to plan on cooking and eating dinner at home, other times I know I will not be able to do it. Same with work, there are some days that make sense for me to take leftovers for lunch because it fits my schedule, other days I know I am going to have to run out and pick something up, it is all in the planning.

If you plan ahead with your weekly calendar, the schedule seems to work out and the more you do it, the easier it gets to make everything fit. Living alone makes it easier for me than some, I can make some meals (roast, turkey breast etc.) last all week which is a great cost saver and can be used in a variety of different ways which eliminates redundancy in choice.

Add to the envelope.


Just because you allocate yourself a certain amount of $ each week doesn't mean you can't add to it! When I am preparing my weekly shopping list I have gotten really good at checking the sales papers and couponing. I usually do my weekly shopping on Sunday, this gives me time to check the Sunday paper for coupons, check my Internet sites for special offers and check the weekly sales sheet from my grocer.

By the time I get to the grocery, I usually add 5 - 10 dollars in savings or coupons. In all honesty I used to look down on people who coupon, but let me tell you, IT WORKS! Now that I have started, I get a sense of excitement when I am able to use what I clip, the savings make a difference.


Store Brands


Buy store brands whenever possible. Now, there are some brands that I am not willing to compromise on, but most you can't tell a difference in, so try the store brand and see how you like it.


Make a List


DO NOT go to the grocery without a list.... EVER! Grocery shopping without a list is the kiss of death to saving money. Write out a list and stick to it! I realize sticking to the list is difficult, especially when you have to walk by all those great cookies and chips. So, IF AND ONLY IF, I don't have any toiletries items to purchase I allow myself $3 to spend on something special, choosing my treat is always fun and feels rewarding in the overall scheme of saving money.


Be smart about how you cook


Crock pot, grill, microwave, and toaster oven cooking is always better than using the stove. When planning your meals, work towards combination cooking, if you can grill it, GRILL IT. If you can put it in the crock pot, do it! Combination cooking saves time, saves energy and gives you more opportunities for menu variety.


This week's menu


Sunday:

Breakfast: Cereal and Toast at home

Lunch: Watermelon

Dinner: I have Bible Study at 5 and we all bring our dinner, so I will stop on the way and grab a sandwich.

Monday:

Breakfast: Cereal and Toast at home

Lunch: We had a new restaurant open on property last week and I have a free lunch card.... WOOHOO, Monday's lunch is free!

Dinner: I will have time to cook because I get home Monday without having to work late. Bottom Round Roast is on sale this week. I will put the roast in my crock pot on Monday morning before I leave for work and include carrots, potatoes, and onion.

Tuesday:

Breakfast: Cereal and Toast at home

Lunch: Leftover Roast beef, potatoes, carrots and onions

Dinner: Salad, Vegetables and Toast

Wednesday:

Breakfast: Cereal and Toast at home

Lunch: Roast Beef Sandwich with chips and cookies (I buy the individual small packs)


Dinner: I have Pilate's and my personal finance class after work, I won't get home until late, so I will pack watermelon chunks for dinner.

Thursday:

Breakfast: Cereal and toast at home

Lunch: Watermelon chunks and homemade trail mix

Dinner: I have a meeting after work and won't arrive home until after 7:30. I will eat a roast beef sandwich

Friday:

Breakfast: Cereal and toast at home

Lunch: Lunch meeting and I was the one invited, so today lunch is free!

Dinner: Vegetable Soup (I canned some vegetable soup mix over the summer, I will warm that along with the remnants of the roast beef, this will be good for the weekend.)

Saturday:


Breakfast: Watermelon

Lunch: I am working at my part time job on Saturday, which includes free lunch!

Dinner: Vegetable Soup


I hope this helps you all with your planning and gives you some cost saving tips. Over the next few posts, I will share savings tips on other household plans and hope you will send in your tips also.


The economy may be in the tank and it looks like there is no end in site, but there are always ways to save and make your life Home Made Easy!
UPDATE:

I just returned from the grocery, I bought all the items needed for the week's menu, plus TP and Paper Towels.

Total spent: $47.01

Total savings: $9.26

Woohoo, I stayed under budget and got several Buy One Get One Free Items which will go into next week as well!!!!!!!!!

Tuesday, August 19, 2008

The Best Banana Pudding, EVER!

I am a son of the south, growing up banana pudding was a treat. My mother used to make it for special occasions from scratch including a beautiful meringue.

Through the years I have tried several recipes for banana pudding and it just never matched what my mama used to make. That is until my Aunt sent me a recipe that her grand-daughter had found.

This is absolutely the best banana pudding I have ever eaten and it features an ingredient that I never thought would work.... Sour Creme!?!?!?!

Last week my Church had a covered dish supper for an important vote we had to take, I decided since it was a special occasion I would make the banana pudding. It was a hit! One of my Pastor's, who is pregnant, came up to me after the dinner and told me that she thanked me and her baby thanked me for the pudding, I loved that!

Ingredients:

1- 14 oz. can of sweetened condensed milk
1 1/2 cups of water
1- small box Vanilla Instant Pudding
1- cup whipping creme
1- cup sour creme
6 - 8- Bananas
1- Box Vanilla Wafers

This recipe is NOT for your diet days, it is loaded with all the good stuff that makes eating a celebration, so enjoy!


Before you begin, put one large bowl and the beaters from your mixer in the freezer. Give them at least 30 minutes to cool.

In a separate bowl, combine the condensed milk and water, mix well and then add the pudding mix. Whisk together until there are no lumps. After this is mixed well, place in the refrigerator.

Meanwhile, take the bowl and beaters out of your freezer. Pour in one cup of whipping creme, beating until it thickens. (This is the most time consuming part of the recipe, when it is beaten it will look like Cool-Whip. DO NOT over beat the creme!)

After the whipped creme is completed, fold in the sour creme. Remove the original mixture from the refrigerator and fold the two together.


Slice the bananas.

Layer the pudding, vanilla wafers and banana, making sure that the pudding ends up as your top layer.


When you have used all of the mixture, break up a few vanilla wafers and sprinkle them on top.


I served in a trifle bowl that I found at Goodwill. This is a beautiful, tasty recipe that everyone in the family will enjoy.

The Best Banana Pudding, Ever, Home Made Easy!

Tuesday, August 12, 2008

Re purposing an Old Table

I have a confession, I am a pack rat. I find sentiment in most everything and hate to get rid of anything that provides me with pleasant memories.

I have a couple of small end tables that I NEED to get rid of, they are old and beaten up, but they still fill a purpose. I hate to get rid of them, so I decided to re purpose them. (Ok, I only re purposed one, but I may get around to the other one sooner or later.)

A few weeks ago I was taking a few days off work for a stay-cation and was cleaning out closets. I found a box filled with old postcards, letters, notes, photos and greeting cards. When I found the box and started going through the contents I couldn't bare to get rid of the contents.

It hit me, a way to use the cards and re purpose the table.

I started off by selecting a few of the cards that visually made the biggest impact.


After choosing the cards, I cut out the impact images and created a simple layout on the table top.


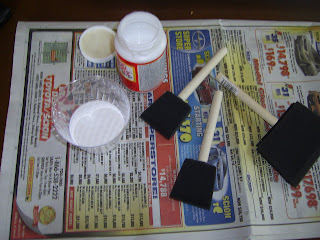
After deciding on the layout, I used my Modge-Podge to apply the images. For those of you who have never used it, modge podge it SIMPLE. All you need is a sponge brush to apply it.


Using long fluid strokes, apply the modge podge to the back of your application and then over the front. This creates a nice smooth surface for your tabletop.


After the modge podge has dried, coat with a polyurethane spray and you have a re purpose for an old table featuring memories of a lifetime.


Re purposing a table and keeping your memories in tact, Home Made Easy.


Sunday, August 10, 2008

Unique Wrap

Last week at the conclusion of my post on candling I mentioned that the small tin candles make great gifts, especially when presented in a unique gift wrap.

Today, we discuss the gift wrap.

One of the things I look for when visiting yard sales or rummage sales is fabric. I find that you can do a million things with fabric, one of them being using it as gift wrap.

Recently. I hit the jackpot at my Church rummage sale when a parishioner who owns an upholstery business brought in countless rolls of yardage. I bought 16 rolls of fabric, each with at least 5 yards on the roll for an unbelievable $16.

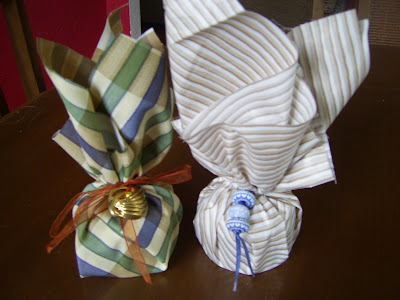
I have used fabric as wrapping paper for years, it molds to the container well and the presentation looks more exquisite than even the most beautiful paper.

When wrapping with fabric choose the cloth you will use.

Cut the fabric into swatches that will give you sufficient play when covering the gift. The cut doesn't have to be perfect, any imperfections will be hidden in the presentation.


You will need ribbon, scissors and an "ornament" for attachment. Like fabric, I buy rolls of ribbon whenever I see it. Most fabric stores or craft shops have bins of reduced ribbon on sale at all times, it is not unheard of to find rolls of ribbon for as low as ten cents to $1....I NEVER pay more than $1 for ribbon.


When you have your gift selected and the fabric cut, place your gift in the center of the fabric swatch.
When wrapping the tins, I just pulled up all the corners, tied it off with a ribbon and attached beads and buttons to provide ornamentation for my presentation.


Inexpensive, quick, easy and beautiful. Unique gift wrap, Home Made Easy.

Friday, August 8, 2008

Ask HME

A dear friend from several other blogs, Lorraine, sent me an email earlier in the week to recommend I add a feature to the blog.

I loved her idea, so here you go.

Ask HME is for you. Email me here anytime with your questions about homemaking, crafting, recipes, or anything else and I will try my best to answer.

Lorraine's question....

"Dear Home Made Easy, I really love using linen water on my, uh, linens, but all a sudden it seems no one makes it anymore. (I really loved the lavender water from L'Occitane but last time I went to get some the woman said they weren't distributing it in the US anymore. Bastard French. Anyway, I suppose I could look for it online but I was wondering if you have any recipes for a nice linen water that doesn't smell like distilled weeds (because that's what happened the last time I experimented)."

I have to admit, I don't use a lot of linen water, but my mother swears by the stuff. I asked her about it and she admitted she hasn't bought any in years, so I decided to do a bit of online research to see if I could find a good recipe.

I found the recipe here. Made a batch used it earlier in the week and LOVED it! Thanks Lorraine, I have made another batch and will be taking it to my mom when I visit her later in the month.

The recipe is simple, try it for a great night's sleep.


Lavender Linen Water Recipe


Lavender Linen Water is a special sweet water that is designed to perfume cloths, bedding, or your collection of fine linens. Apply while washing or during the folding process.

Add a splash to the rinse cycle, or sprinkle, spray your linens before or during ironing. Lavender has a soothing, calming effect that will help one sleep peacefully.

Here are the ingredients for making your own:

100 drops (5ml) of Lavender Oil
1½ fluid Oz. (45 ml) Vodka. Use highest proof available.
20 Oz. of Distilled or Still Spring water

Blend/Mix the essential oils with the Vodka in a small glass bowl. Stir well to amalgamate. Pour water into a large glass container/bottle. Add the oil mixture to the water. The linen water may be cloudy. This is normal and will not stain linen. Shake well before use.

And this is Linen Water Home Made Easy.

Send your questions in, I look forward to answering them in future posts.

Sunday, August 3, 2008

Candling Made Easy...

I apologize for not posting recently. First I had computer problems and then camera problems and then life got in the way of posting. Hopefully now I am back up and running.

I have been making candles for quite sometime. I find it to be a rewarding and easy craft with a big payoff.
I have made candles in a variety of containers and in a variety of colors, it is super easy and fun.
Recently I found a number of miniature tins at my local craft store for fifty cents each. I bought $20 worth, knowing that they would make super cute candles that I could use for a variety of purposes.
Candling requires a number of steps, all of them easy to follow.
Required for this project is....
A block of wax
Melting pot
Thermometer
Knife
Wicks
Clothes pins
Tins
While you are preparing the process, I place the tins in the over at 170 degrees to warm. This allows the tins to be ready for the melted wax when it is poured in. The tins need to be warm so that the wax doesn't crack when it hardens.
In a large pot of hot water (just before boiling) place the melting pot with a large chunk of wax. Place your thermometer in the wax as it melts. Candle thermometers are marked with temperatures for different containers, always use this it helps with the process as different types of containers require different temps. For a tin you want the wax to melt to approximately 225 degrees.
For me the most difficult step in making candles is getting the wick to stand in the center. Some people use straws, others use the cover of a Bic pen, but most everyone uses clothes pins in the process. I have done all of the above and still use the different techniques depending on the style of candle I am making. For this particular candle I used just the clothes pins and a bead weight to hold it down.
Once the wax is melted you may add color or scents. All of these may be purchased at a craft store. For these particular candles I decided on no color since the containers were so colorful and added apple as my scent.
Pour the wax into your containers leaving a small amount of space at the top.
Don't use all of your wax at this point.... you will need more later!
Once the wax is in the container I then center my wicks and use the clothes pins to hold them in place while the wax hardens.
After the wax has hardened you will find that it may fall a bit in the center, this is when you will reuse the additional melt. Pour in the additional wax and bring it near the top of your container.
After the wax has hardened cut your wicks.
What an adorable and fragrant candle and easy to make!
These candles make great hostess gifts and can be wrapped in delightful creative ways, I will present the fun wraps in a future post.

Candling for yourself or others.... Home Made Easy!